Have you heard of stained-glass art? This is the art that uses glass to make various objects used in daily life. Unlike other materials, glass is transparent and uniquely reflects and refracts light. If you hang a suncatcher in your room, your everyday objects glimmer beautifully. In Jeonju, there is a handicraft studio where you can experience stained-glass art. The JBNU Globe visited it and experienced creating stained glass. Shall we take a look at the process?
- Rough Pieces Reborn as Work of Art
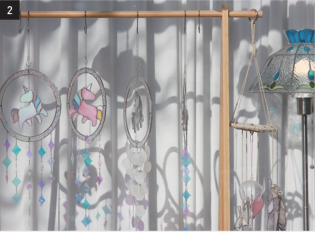
When I arrived at Yuri Viche, a studio where we can experience stained-glass art, I felt good even before I went in. I was greeted with small items that shone in the sun. In particular, that day was very fine, and it made me feel as if I were shiny and beautiful. Thus, if you want to join the class, I recommend you visit on a sunny day. There are so many brilliant and lovely items that are impossible to capture in a picture. When I entered the studio, the instructor welcomed me joyfully. People who take one-day classes are often first-timers, so she relaxes attendees by starting off with some light chat.
I sat down after donning a work apron, sleeve protectors, and gloves. A sign in front of the desk lists in detail precautions to take during the class, the order of classes, the tools' names, and their usage. The class started after we took a moment to read it carefully.
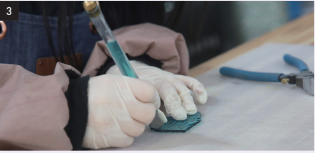
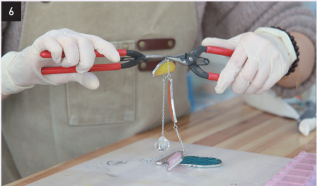
Before I started making suncatchers, I listened to an explanation about how to cut glass and I practiced using a glass cutter. During the process, I learned how to handle not only glass cutters but all the tools, such as running pliers and breaking pliers.
|
1. Glass Cutters: These are used to cut glass. The top part of the glass cutter contains oil. The oil reduces friction when pressed, allowing the blade to be used longer and helping it to cut smoothly. 2. Running Pliers: They are useful for cutting curves. They are mainly used to break off large pieces. 3. Breaking Pliers: They are used for breaking off pieces of glass. They are mainly used to split off small pieces. |
After practicing, it was time to choose a design, which is the process of deciding what shape to cut the glass. There are various shapes such as a flower, a moon, and a cloud, and you can choose two of them. When I had chosen the two shapes, I then had to decide which pieces of glass to carve. Considering the color and transparency, I was allowed to choose two pieces of glass sandwiched between colorful glass pieces. The instructor sketched the design on top of the glass piece I chose. Then I cut the glass to fit the shape as I had practiced earlier. However, this process was harder than I thought!
|
Tips! It's okay not to cut all the winding sides at once. Try to use the glass cutter vertically as much as possible. If the glass cutter is tilted and under pressure, not only does it make it difficult to cut on the line properly, but it can also cause small fragments to form when splitting the glass later. Additionally, don't forget to sweep away pieces of glass from time to time! |
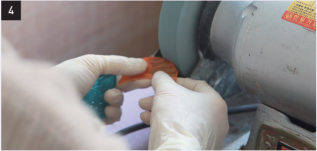
Don't worry if the sketches and the glass pieces are not exactly the same shapes. Even if its outline is rough, the instructor trims it minutely. The grinder was able to refine the rough areas and bring out the precise details.
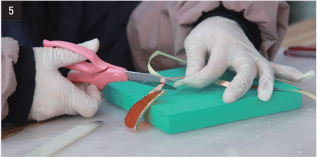
It was nearly done! The next step was to put copper tape on the edges of the trimmed glass. This is essential before the next step is taken. The copper tape should be attached to the front and back as evenly as possible. That way you can make a nice border that will not fall off. It was difficult for me to attach the tape along the curves, but I was able to complete it with the instructor’s assistance.
Before I moved on, I had to wear sanitary gloves and electric gloves. The next step was soldering. I changed the color of the copper tape through soldering to silver. When my turn was over, the instructor perfected the work. After trimming the bumpy parts and attaching a link to connect them, she washed the pieces.
|
Caution! Make sure to wear protective equipment. The temperature of the soldering iron is very hot, so extreme caution is needed. If you play around or fail to concentrate on your work, you may have an accident. Safety is the most important thing! |
The final step was to pick the other three pieces of glass. A total of five pieces of glass are used for the suncatcher, so I had to choose three more in addition to the two I made. After I chose the rest of the pieces and arranged them, I wove them together using loops. Then it was over! I was able to make my own suncatcher in this class. A suncatcher gleaming in the sunlight is a beautiful sight to behold. The process of making it was not easy, so the finished product felt more precious.
A rainbow now appears in my room every time there is sunlight glinting through my window. It was not too difficult after all to capture sunlight! Like a suncatcher’s name suggests, good vibes seem to seep into my room. Do you want to capture the light? If so, why don't you make your own special suncatcher?
| Park Ji-woo Editor-in-Chief, Kim Doe-hye Reporter